 Nothing beats a perfectly baked pizza made from scratch, with just the right texture, taste, crunch and shape. After 40+ years of effort I claim that I can produce one or two, especially if there is a handy wood-burning brick oven within reach like the one in the photo! It shouldn’t take you that long to duplicate the result even with a conventional oven but it might. Why? Because, dagnabbit, there are too many variables in the way.
Consequently any source you choose to consult, and there are thousands, probably will not work exactly as advertised. Only the commercial shops and restaurants using precisely measured ingredients and maintaining a constant environment, rising time, oven temperature and so on, can get a consistent result time after time. After all, their income and reputation depend on it! Note I said “consistent” which could mean consistently bad as well as consistently good.
At home the situation is entirely different. Even if you follow a book or web recipe to the letter you may not get the same result each time because the hidden variables are at work. Think room temperature, humidity, type of flour, type of yeast, soft or hard water. There may be others.
Not to say you can’t ever beat Domino’s because you certainly can (and it’s not that hard). Commercial enterprises of that scale and magnitude cannot avoid introducing elements into the process, preservatives or stabilizers for instance, that compromise taste and quality. So you and I can match up one of our lesser creations against Papa John any time day or night if we plan accordingly.
You want to be a pizzaiolo right? If so stick around for a moment and read on. (Pizzaiolo = Italian for pizza chef, pronounced “pizza-yolo.”). Herein lies what they don’t tell you in the recipe books. Settle in, this is going to take a while.
You start by reaching for the bag of flour in the cabinet. Wait…. What is it? All purpose? Bleached? Unbleached? Bread Flour? Durum wheat? Whole wheat? Or…or…maybe….you’re one of the few people in the U.S. who has latched onto the mysterious “double zero” better known in Italy as “doppio zero” – not to be confused with a variety of Starbucks Coffee. Well, if you were to take yourself to Naples one fine day you will discover that everybody and their mother-in-law is using the “OO,” alone or in combination with single “O”, whether in the restaurants or the family kitchen.
What’s the big deal? If the trick is to use an extremely finely ground, high protein flour, as seems to be the case, then why not settle for a bread flour, sold in the markets in my area predominately under the King Arther label. And so we can. Unless you like spending 3 bucks and up for a two-pound bag of “OO” the bread flour is just as good, although I doubt the Neapolitan pizzaioli would agree. Admittedly I do shell out for the “OO” from time to time.
Will all-purpose work? Yes it will, but somehow you don’t get the magical combination of tenderness and crunch that typifies most of the pizzas consumed in Italy. So I sometime compromise by mixing the OO with the O (better known as all purp0se) as in the recipe below. Most often, absent the “OO,” I reach for the King Arthur brand of unbleached bread flour. But no matter what the flour selection is I do not ever achieve the same result as the chefs in Naples no matter how I vary the process or the flour choices. However I am getting consistent if nothing else.
Turning to the yeast the choices are active dry, rapid rise and cake yeast (i.e. the refrigerated cubes). In Italy the popular choice is brewer’s yeast or lievito di birra. I’ve never seen anything in the U.S. labeled that way but I suspect it’s somewhat the same as cake yeast. I avoid rapid-rise. To me it is nowhere near as effective as the active dry or cake yeast.
The next variable is olive oil and herewith I lay down a challenge. Does it belong in the recipe at all? Except as noted below I say no and for support I introduce as Exhibit A the official certified recipe published by the Neapolitan Pizza Bakers Association. I am dead serious. There is such a group and they do have a “DOC” recipe, which appears below. Nonetheless probably 90 percent of American pizzaioli and a much smaller percent of Italians seem convinced that some amount of olive oil needs to be added during mixing. It doesn’t.
So try it both ways. I’ll bet you find that adding olive oil not only does nothing for final taste or texture, but renders a springy dough that resists being rolled out flat, like trying to roll out a partially inflated balloon. You will see later that I do in fact use a teaspoon or so of olive oil (1) to avoid sticking while storing the dough in a zip lock until ready for use and (2) for drizzling lightly on top of the assembled pizza prior to cooking. Now if we’re talking about Tuscan focaccia bread that’s another matter. Olive oil is used in significant quantities, but more about that some other time.
OK now the water. You would think there can’t possibly be much variation in that simple ingredient. Wrong. Some experts think it matters whether your water supply is loaded with extraneous chemicals such as iron, fluorine, calcium etc. According to Pamela Sheldon Johns, author of a thoroughly researched and exquisitely illustrated little volume called Pizza Napoletana (Ten Speed Press, Berkeley CA, 1999), the pH (acidity) of the Neapolitan water supply is 6.7. The claim is that such an ever so minute level of acidity has a beneficial effect on the final product. Wow!
I just stick with the tap water, which comes from a well on my property. I have a filtration tank that removes most of the undesirable chemicals. I never tried bottled spring water so maybe there is an opportunity there.
Then we come to the salt. Plain table salt would not pass muster in Naples. The official pizza dough recipe calls for sea salt (which by the way contains any number of extraneous chemical interlopers). Bottom line here, while not wishing to impugn the Neapolitan All-Stars I maintain that sodium chloride is all that is necessary. Proving a difference between a dough made with regular salt and one made with Sel de Mer would require a double-blinded taste test conducted with a panel of sober Neapolitan judges.
Incidentally I read that salt has a tendency to slow down the action of the yeast cells so I have taken on the practice of adding the salt somewhere toward the end of the mixing process and just before the dough is ready to be turned out for kneading. It’s just a precaution that I follow, knowing full well that no one else on the planet does the same.
Lastly there is the oven temperature. The ideal temperature for baking pizza is 650-700 degrees a level that no standard household oven can achieve. The wood burning stove does get up that far which is why pizzas made that way are so great. Whatever you do get the oven up as high as you can and toss out those recipes that say it’s ok to bake at 400 degrees. It’s not.
So the authentic, certified, gold-plated dough recipe if you believe the Neapolitans, is this:
Home-made Pizza Dough
-
1/2 cake fresh yeast or 1 envelope active dry
- 2 cups or so lukewarm water
- 1 cup bread or pastry flour, or the OO if it’s around
- 6 cups more or less unbleached all purpose flour
- 1 1/2 tablespoons sea salt (you already have my opinion on the sea salt)
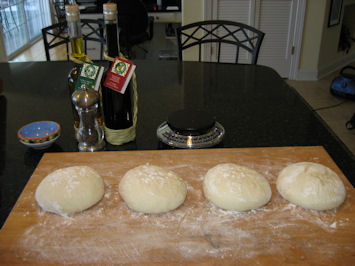
Drag out your trusty Kitchen-Aid mixer, add the lukewarm water to the bowl and stir in the yeast until dissolved. Wait until it forms a nice beer-like head then add the 1 cup bread flour and mix well. As indicated my variation is to hold off on the salt until all other ingredients are mixed and then add it at the end of the mixing cycle. Add the all purpose flour 1 cup at a time and let the dough hook do the work for about 20 minutes or longer. Gather the dough into a ball and place in a bowl lightly coated with olive oil. Cover with a kitchen towel and let rise for 4 hours. Remove dough, punch it down, knead it by hand for a few minutes and divide it into 5 or 6 pieces shaped into a snowball. I use a kitchen scale to achieve equal size doughs of about 10 ounces each, which is sufficient for a 14-inch diameter thin crust. Cover and allow to rise for another 2 hours.
Bringing the dough to the right consistency is the hardest part (next to rolling it out into a perfect circle). You may need more or less flour depending on the variables in temperature and humidity. Generally the dough should be stiff enough to hold its round shape on the board without oozing off in all directions. A pastry scraper is the ideal tool for moving the dough around and helping out with the kneading process. At this point the doughs can be set aside in lightly oiled zip locks to be frozen or refrigerated for later use.
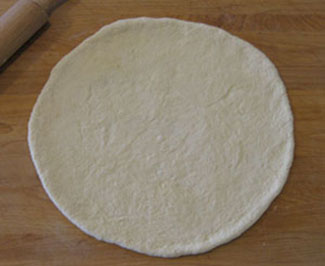
When all is ready you next take on the daunting task of creating a perfectly round dough which should look something like these nice round specimens:
For years my doughs would refuse to take the proper shape and instead always came out looking like the state of Michigan. The secret is to start with a perfectly round-shape snowball, press it down firmly with finger pressure to form a disk, then pick it up and rotate it by the edges until it starts to enlarge. Then I place it back on the board and roll with a marble rolling pin as if I were making a pie crust (a heresy in many circles). I pick it up again and then grab it by the edge using only knuckles to flip the dough round and round, hand over hand, further stretching it out. It then goes on the pizza peel dusted with corn meal to prevent sticking, making sure it slides easily before dressing it up with the topping goodies. All of which leads to:
Classic Pizza Margherita DOC
For 5-6 “personal size” pizzas or four 14-inch pies (my standard size):
-
pizza crusts rolled and stretched to desired size
-
28 0z. canned San Marzano tomatoes chopped (I use a food mill to remove seeds, but you don’t have to)
-
buffalo mozzarella (available at Costco, Trader Joe’s and Italian specialty shops)
-
1/4 cup grated parmesan (I use parmesan and romano mixed together)
-
sea salt to taste (just buy a box of regular salt somewhere near an ocean)
-
fresh basil leaves shredded by hand
-
extra virgin olive oil
-
optional: 1 wood-burning brick oven installed in your kitchen (available from Tuscany for about $10,000 on sale).
 Preheat oven to maximum temperature, at least 500 degrees. In the absence of the wood burning oven use a pizza stone. Prepare doughs one at a time. Place rolled-out dough on a wooden peel dusted with cornmeal. Spread enough tomato evenly to reach within 1/2 inch of the edge. Sprinkle with salt and grated cheese to taste. Add thin mozzarella slices, staying away from the edge. Drizzle a thin stream of olive oil over the top again staying away from the edge. Slide onto pizza stone and bake until edges are golden brown and mozzarella just begins to show some caramelization, about 6 – 7 minutes. Remove from oven and add shredded basil to taste. I actually add the basil before the mozzarella so that it is buried and won’t burn during cooking. I get more basil flavor that way.
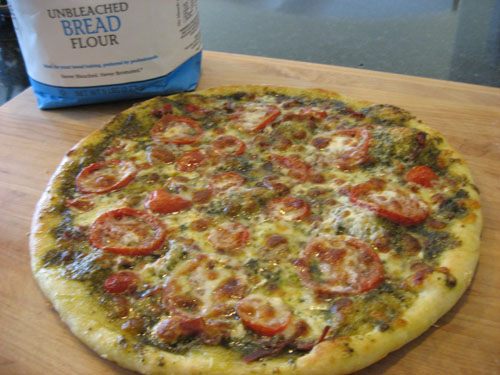
So there you have the grand daddy of all pizzas. Notice the absence of peperone (the circles on the pizza in the photo are fresh tomato slices. Also no mushrooms, olives and all other toppings commonly preferred by U.S. customers. All of these can be used as desired of course. I just wanted to illustrate the original as it was made for the first time in the 19th century in honor of Queen Margherita’s royal visit to Naples.
This one was actually made with garden-grown San Marzano tomatoes. Off the chart!


