 In the kitchen my early adult life was spent slowly and absent-mindedly absorbing cooking knowledge from parents and grandparents. At the time I rarely attempted to make anything that wasn’t connected with pasta or pizza. Items of that description were my only output for years, not counting my unremarkable achievements with the outdoor grill.
However later in life, as I started to think about retirement and the time it offers to pursue serious cooking and entertaining, I began to look into appetizers, soups, salads and side dishes that are both tasty and, with notable exceptions, easy to make, leaving me more time to focus on the main dish. Cooking school at Wor-Wic College in Salisbury MD introduced me to all the elements that make up a quality appetizer and other selections, including the bite-sized stand-up-and-eat munchies that the French call “amuses bouche.”
After having practiced a number of recipes that fit within my skill set I went about serving up the selections to innocent bystanders at every occasion. I served them often enough to convince me that they are worthy choices to introduce any meal or party occasion. So I have gathered together for public scrutiny my top appetizer recipes. Most of which are pretty basic, familiar, road tested and never seem to fail.
_________________________________________________
Insalata Caprese
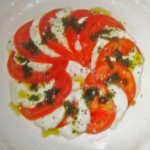 Supposedly originating on the Isle of Capri this five ingredient basil-accented appetizer adorns just about every restaurant menu south of Rome. Considered primarily a summer dish it cannot be accomplished properly without buffalo mozzarella. The famous soft cheese from the milk of the water buffalo is rarely found in the chain supermarkets in the U.S. In Italy on the other hand you can pick it up at gas station snack shops or their version of 7-Eleven, known as “Despar” convenience stores. Here in America you may have to hurry on down to Trader Joe’s, a specialty shop or go online. Make no mistake the imported product has nothing at all in common with mass-produced cow’s milk mozzarellas like Sargento or Sorrento/Galbani brands for instance. Just be assured that if you can latch on to it you have a guaranteed winner!
For 4 persons:
- 1 lb. buffalo mozzarella sliced into thin rounds (I use a thin blade fish fillet knife for this step)
- 2-3 medium very ripe garden tomatoes sliced to ¼ inch thickness (hothouse or artificially ripened tomatoes don’t work, tomatoes “on the vine,” though, are a workable substitute)
- ¼ cup coarsely chopped fresh basil (the traditional version calls for hand-shredded leaves)
- ½ cup extra virgin olive oil (drag out the premium bottle you got for Christmas)
- salt & pepper to taste
Combine the basil and olive oil in a bowl, mix vigorously and allow to stand for a few minutes. Meanwhile arrange the tomato slices alternately with the mozzarella on a serving dish. Add salt and freshly ground black pepper. Then drizzle the dish with the basil and olive oil. Some recipes on the Italian websites call for a sprinkling of oregano as well. Your call.
______________________________________________________________________________
Antipasto Misto
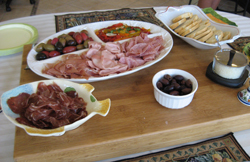 An arrangement of thinly sliced Italian cold cuts on a fancy platter has been a knockout feature of all the buffet dinner parties held so far here at the house. As soon as they spot the platter guests don’t bother to make little sandwiches with the homemade baguette slices on the table. They just pick up the meats with fingers and within minutes the platter is empty. The secret is to take the time to locate a really good Italian deli in your area. Except possibly for Wegman’s stores the supermarket chain stores are not the best place to search for the top quality selections, although there are exceptions depending on the item. For instance the A&P Super Fresh chain in my area carries an excellent imported prosciutto under the Negroni label. The prepackaged assorted cold cuts sold in the big box shops (Costco, BJ’s) are to be avoided. Look around. The good stuff is not that hard to find. If you live in Montana you got a big problem. If you live in Texas and can get to the Central Market in Dallas you are blessed!
A word about prosciutto. There is no domestic brand that can compare to the imported product, except for one. That is the Daniele brand made in my home state of Rhode Island of all places. Forget Boar’s Head, Dietz & Watson, Carando and all the other domestic imitators. I’ve tried them all and they don’t compare, even though Daniele, acting as what we would call in the pharmaceutical industry a “contract manufacturer’ apparently is the actual producer of several of the other brands. Problem is they follow their customer’s specs not their own. I checked.
Other cured meats commonly used in Italy are Bresaola – made of cured and aged beef, Sopressata – a style of cured pork similar to “peperone” in appearance but not taste, and Capocollo – pronounced “gabba gawl” by Tony Soprano and his gang.
For 8 persons:
-
1/2 lb. thinly sliced imported Prosciutto di Parma fat trimmed
-
1/2 lb.thinlhy sliced mortadella with pistachio (it’s worth searching for the version with pistachio nuts)
-
1/2 lb. thinly sliced Genoa salame (in this case there is one domestic brand that beats everybody – Hormel!)
-
1/2 lb. Abbruzzese or Calabrian dried sausage (found mostly in the specialty stores in whole links. The deli should be willing to slice them up for you – thin as possible)
-
sprigs of fresh flat leaf parsely or basil for garnish
My way of presenting the cold cuts is to arrange the larger items (prosciutto, salame and mortadella) in a tented form on the platter to gain some height. The smaller slices can be arranged in spirals or any pattern you like. Try out the other meat choices that are are the spicier and fattier, sopressata or capocollo (pronounced ‘gaba-gawl’ by Tony Soprano), as well as the bresaola, rarely found in the shops but no problem on line. Serve with an olive medley and some roast red peppers.
_________________________________________________________________________
Caponata Siciliana
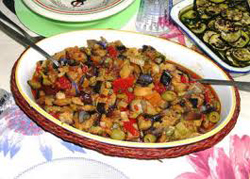 Many more food fanciers have heard of French ‘ratatouille’ than Sicilian ‘caponata.’ Nonetheless the two terms describe more or less the same vegetable appetizer built around the eggplant – a signal that the dish originated in the southern Mediterranean, most likely North Africa and eventually exported to France by way of Sicily.
This particular recipe comes from a book The Food of Southern Italy by Chef Carlo Middione, an outstanding authority on the cuisine of that region. His great TV series “Carlo Cooks” has disappeared into the archives of television. Carlo says the onions, celery and eggplant dices must be cooked up separately because they require different cooking times and the eggplant needs to be browned on all sides. However in my opinion cooking at least the celery and onions together is fine and saves time.
For 8-10 servings:
- 3 medium fresh ripe tomatoes skins removed and diced (might be ok to use a can or so of diced tomatoes drained)
- 1/3 cup Gaeta or Kalamata olives pitted (Gaeta olives are milder than the Kalamata but rarely found in pitted form)
- 1/3 cup large green Sicilian olives or large Spanish Manzanilla pitted (no need to take out the pimento if any)
- 2 heaping tbsp. golden raisins softened in hot water
- 1 ½ tbsp. capers drained
- 1/3 cup or more extra virgin olive oil
- 1 large eggplant cut in ¾ inch dice (I peel off the black skin but most Sicilians don’t. No need to salt and drain off the “bitter juices”, it’s a waste of time)
- 2 ribs celery diced
- 1 large yellow onion coarsely diced
- 3 tbsp. red wine vinegar
- 2 heaping tbsp. lightly toasted pine nuts
- salt & pepper to taste
In a bowl mix the diced tomatoes, vinegar, pine nuts, olives and capers and set aside. Heat 1/3 cup olive oil in a large saute’ pan. Add the eggplant and after about 2 minutes begin turning and stirring occasionally to brown on all sides. Add salt and pepper. Remove eggplant to another container. Add more oil to the pan if necessary and cook the celery and onions until softened, again adding salt and pepper. When the onions and celery are well softened, about 8-10 minutes, return the eggplant to the pan. Add the tomatoes, olives, pine nuts and capers and cook all the ingredients together for an additional 15 minutes at low heat. Transfer to a serving container and let cool to room temperature. Serve with slices of crusty bread.
____________________________________________________________________________
Oysters Rockefeller
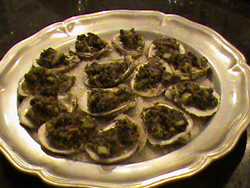 This recipe is based on one found in the New York Times Cookbook (p. 42). My version does not include chopped lettuce and parsley because I believe they detract from the spinach flavor. Nor do I use the anchovy paste, a veritable noxious substance that needs to be banned from the marketplace. If you want to include anchovy (which is an essential item in my opinion) mash a filet or two from the can that has been sitting around in your food closet for the last 6 months. Some recipes (e.g. Tyler Florence) call for parmesan cheese. Do not go down that road. Parmesan cheese will overpower everything else in the mix. Do you want to taste oysters or parmesan cheese? You can’t do both!!
The main challenge is opening oyster shells, a task that requires the strength of Arnold Schwarzenegger (when he was much younger), and a touch of patience as well. The way around this step of course is to purchase oysters already shelled and bottled in their own liquor. You can ask the fishmonger to give you a bunch of empty bottom shells – not the flatter top shell characteristic of most East Coast oysters. As for me however I don my apron, my heavy duty rubber gloves, grab my oyster knife and hack away at the stubborn critters – cell phone handy in case I have to dial 911.
Traditionally Oysters Rockefeller recipes call for a dash of Pernod liqueur in the topping. I found that Sambuca works just as well. Just don’t overpower the mixture with it, whichever one you use. I normally sample a shot or two before adding it to the topping just to be sure it’s ok.
For 6 persons:
- 3 dozen oysters (shucked for you by ex-Gov. Arnold Schwarzenegger or pre-shucked at the store)
- 1 lb. or more rock salt (yes, the same stuff you use to melt the ice on your driveway)
- 1 lb. cooked and finely chopped fresh spinach (try to avoid the temptation to use frozen chopped)
- 1 large celery stalk finely chopped
- 1 garlic clove finely minced (do you get the impression that ‘finely’ is a buzzword around here?)
- ½ cup thinly sliced scallion (trim off the dark green portions)
- ½ lb. unsalted butter (unsalted is the only variety of butter found in Chef Ludovico’s fridge)
- ½ cup unseasoned bread crumbs
- 1 tbsp. Worcestershire sauce
- ½ tsp. salt or to taste
- Tabasco sauce to taste (can also be served on the side)
- 2 tbsp. Pernod or Sambuca liqueur (be sure to sample it first, you never know)
Heat butter in a saucepan. Add spinach, celery, garlic, scallions, bread crumbs, Worcestershire, Tabasco, salt and liqueur and stir until heated and well combined. Remove from heat and refrigerate. Place oysters on bottom shells and lay in a baking dish containing about a ½ inch layer of rock salt. Top each one with a generous teaspoon or so of the spinach mixture. Bake for 12-15 minutes depending on oyster size, or until hot to the touch. Guard against overcooking.
If oysters are truly some sort of aphrodisiac as a precaution you should have your guests take a cold shower before serving.
__________________________________________________________________________________________
Mozzarella in Carrozza
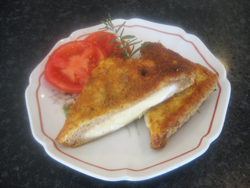 How this dish ever got its name is beyond me. The literal translation is “Mozzarella in a Carriage” but the recipe yields up the southern Italian equivalent of a grilled cheese sandwich elevated to a whole new level with the use of anchovy-flavored oil for the saute. This immensely popular appetizer is in fact as easy to make as a grilled cheese sandwich, which is why it’s on my list. The only consideration is the choice of mozzarella. I make it a point to use the freshly made mozzarella packed in water found in the deli section of the store. Just about every big chain supermarket in America has it available in that form, so no excuses. (To be honest some good ol’ American Muenster cheese works great also. You can call it “Meunster in Carrozza”).
Needless to say there are hundreds of variations around, not the least of which is Mario Batali’s version described in his book Molto Italiano. With all due respect to Mario his version, which omits anchovy and bread crumbs, and adds thyme – his favorite herb – is not at all what I remember during my years in Rome but, again, if it tastes good so what? Nonetheless my attitude is “if it ain’t broke don’t fix it.” The traditional recipe below is gold plated and needs no tinkering!
For 4 persons:
-
8 slices white bread, crusts trimmed off
-
1 lb. fresh mozzarella cheese thinly sliced
-
3 or 4 anchovy filets mashed to a paste
-
1/4 cup or more olive oil
-
1 cup unseasoned bread crumbs
-
2 eggs lightly beaten for dredging, or 1 large egg plus 2 tbsp. milk
-
salt & freshly ground black pepper to taste
-
tomato slices, sprig of parsley or rosemary for garnish
Heat olive oil and mashed anchovy in a saute pan. Stir to distribute the anchovy all around. Prepare a breading station with the eggs and bread crumbs. On each of four slices of bread distribute the sliced mozzarella on top. Cover with the remaining bread slices. Dip the sandwiches in the egg taking care to coat all around. Transfer to the bread crumbs and dredge. If saute pan is big enough place two sandwiches in the pan and cook each side on medium high heat until browned. Repeat with the other two sandwiches. When all sandwiches are done add freshly ground black pepper to each then slice diagonally. Add the garnish and serve hot. Say, I wonder if a dusting of Pecorino Romano cheese on top would take this dish up yet another level??? Just thinking out loud.
__________________________________________________________________________________________
Quiche Lorraine (or is it Alsacienne?)
 Think of an Italian frittata in a pie shell and you get Quiche Lorraine. Well, maybe not exactly, but close enough. Regardless, the classic French dish, whether served as an appetizer or main course is about as simple as can be and takes not much more than 30 minutes to prepare, even if you make your own pie shell rather than using a store-bought frozen one.
Apparently the original version contained no cheese or onion, just egg, creme fraiche and ‘lardons’ or smoked country bacon cut into short strips. Lorraine’s neighbors down the road in Alsace France came up with the idea of adding onion. Over the years Gruyere and/or Emmenthaler cheese and miscellaneous vegetables joined the party as other French regions picked up on the dish. As for me, I like to call my recipe “Quiche Alsacienne Embellee” (embellished) since it has onions and some of the other veggie add-ons now prevalent in modern quiche recipes, plus one ingredient that isn’t.
It starts with the time honored recipe for Quiche Lorraine found in Anne Willens’ The Country Cooking of France, p. 46. According to my good friend Anne (we never met) creme fraiche is an important requirement but may be tough to locate. Best bets are Trader Joe and Wegmans. You can also make it yourself as long as you’re wearing your black beret and Fleur De Lis apron when you do it. Final note, frozen puff pastry is a common alternative to a regular pie crust and actually seems to be preferred by many French chefs.
For 6 persons:
- 1 pie shell or puff pastry sheet defrosted and rolled to a 12 inch diameter circle
- 1 tbsp. butter
- ½ lb. thick sliced bacon cut into short thin strips (I actually use lean country ham rather than bacon)
- 3 eggs lightly beaten
- 1 cup creme fraiche (thin out with some heavy cream if too thick)
- 1 medium red or white onion thinly sliced
- 1 small red bell pepper julienned
- 1 cup broccoli florets separated into small pieces
- 1 cup Emmentaler, Gruyere or imported Swiss Cheese grated (mix ’em up why don’t you)
- 1 cup Fontina cheese grated (my departure from the French crowd)
- 1 pinch nutmeg
- olive oil for saute
- salt & pepper
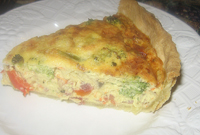 Preheat oven to 350 degrees. Blind bake the pie or puff pastry crust in a 9 ½ inch pie pan for about 15 minutes. Meanwhile cook the onions and bell pepper with olive oil in a saute pan at medium heat until well softened, about 10-12 minutes. Add ½ teaspoon of salt during cooking. Set aside. Cook the broccoli florets in salted water until done. Drain. Cook the bacon ‘lardons’ in the butter until lightly browned. Drain off the fat and pat dry with a paper towel. In a large bowl mix the eggs and creme fraiche. Add the onion, red pepper, broccoli, cheeses, salt, pepper and nutmeg and stir. If the mixture doesn’t look like quite enough to fill the pie shell add more beaten egg (I use Eggbeaters instead to keep the cholesterol count down, not that it isn’t in the stratosphere already). If more than enough set the excess aside and make a frittata omelette with it for a great snack while you’re waiting for the quiche to finish up in the oven. Pour a glass of Pinot Grigio to go with it.
Pour the mixture into the pie shell and bake in the oven for about 40 minutes or until the mixture has puffed up and is well browned on top. You can check for doneness with the old stab-the-cake-with-a-knife trick, but I hate to ruin the looks of the nicely browned top.
Let the quiche cool down slightly before serving. Sing a chorus of “Frere Jacques” then go ahead and serve it up.
_____________________________________________________________________________________
Roman Artichokes
 In all my years I don’t remember ever seeing artichokes appearing as a separate line item on U.S. restaurant menus, not even any of the Italian establishments I have visited. They do show up in the unappealing commercially bottled or canned form as an ingredient on pizzas or salads. The reason for this, I’m guessing, lies in the steps required to prepare fresh artichokes for cooking. In particular, it’s the infernal choke buried in the center that causes grief. Nonetheless “Carciofi alla Romana” are as prevalent among Roman restaurant appetizers as shrimp cocktail or chicken wings in the U.S.
If you are motivated to run the gauntlet, serving up a first course of Roman artichokes will render your dinner party memorable if nothing else. If you execute the steps correctly (and I’m not claiming that I do) you can skip cooking school altogether. Fresh artichokes are character builders.
This recipe does not follow the traditional Roman protocol mainly because the Romans use mint as a flavoring accent, an herb I have never learned to appreciate. My version harks back to the delectable steamed artichokes served up by my late wife (who was of Polish extraction mind you), mother and grandmother, all of whose versions have much in common with the Roman original, minus the mint.
I also don’t perform the extensive trimming of the leaves down to the point where half the artichoke is tossed in the trash, leaving only the tender center intact for steaming. I don’t do that. I do some trimming, but leave about 70 percent of the artichoke intact. The big outer leaves contain delicious pulp at their base which can be extracted by scraping the leaf over your bottom teeth. I also don’t remove the choke until after cooking, which is much easier to accomplish.
So for an exercise in character-building here is what to do:
For 4 persons
-
4 medium-size globe artichokes (the basketball-sized versions found in many stores don’t work)
- 1/2 cup olive oil
- 1/2 cup white wine vinegar (might try rice wine or champagne vinegar for less of an acid flavor)
- 1 tbsp. Dijon mustard
- 1 can anchovy filets drained
- 1 tbsp. fresh chopped flat leaf parsley
- 1 tbsp. fresh chopped mint (if you are a fan and insist on doing what the Romans do)
- 1/2 cup bread crumbs
- salt & pepper to taste
Using a steamer insert and a large stockpot, bring about 4 cups of water to a boil. Meanwhile with a serrated bread knife cut off the top third of each artichoke. Remove the bottom two or three layers of leaves and with a sharp paring knife trim off the end and tough outer skin of the stem. The recommended step of placing each artichoke in acidulated water while this is going on has never proved effective for me so skip it. Just try to work as fast as you can in a race against the browning of the exposed artichoke surfaces.
Steam the artichokes under cover for about 35 minutes or until a skewer passes through the center with little resistance. Cooking time is dependent on size. Overcooking slightly is preferable to undercooking.
While artichokes are steaming place olive oil, vinegar, anchovies, mustard, pepper, parsley and mint (if your including it) into a blender. Blend until smooth. Remove from blender and place in a bowl. Add bread crumbs, salt to taste and mix well.
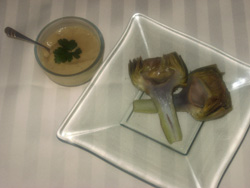
When artichokes are done carefully cut each one lengthwise. With a paring knife make an incision all around the base of the choke and then coax it out with a teaspoon being sure to remove not only the fine bristles but also the surrounding layer of inner leaves with the purple tips. Definitely don’t want to bite into those thorny leaves. Serve two halves on a plate and spread a tablespoon or so of anchovy dressing over each half. I usually make enough dressing to fill a small finger bowl next to each place setting so that the outer leaves can be dipped in it for the scraping ritual.
Another option is to remove the tough outer leaves before serving, but set them aside in case anyone wants to scrape.

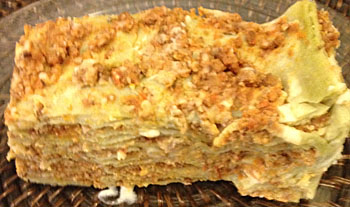
 There are a few dishes than I can make with eyes closed and one hand tied behind my back. Lasagne is not one of them. My approach to this classic pasta dish requires two hands, blood, sweat and tears.
 First, though, here you see the table setting ready to receive my signature pasta dish as a first course. Presiding over the event on the left is my sister the Countess Mariana Krause Von Furstenberg, last living heir to the Kingdom of Sardinia, and her daughter – my niece – the Princess Karabella. In the background is an oversize painting of our maternal grandmother Marietta and her daughter – i.e. our mom – Theodolinda, both of whom were no slouches when it came to making lasagne.
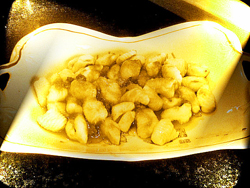 I know there are hundreds, maybe thousands of high profile dishes around the world whose correct pronunciation is possible only for native speakers of a language. However because “nokeys” seem to have become such a recurring featured item on the cooking shows and websites lately someone should blow the whistle.
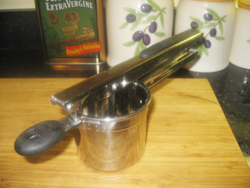 Second, the question is whether to mash the cooked and peeled potatoes with a food mill vs. a potato ricer. Again the Italian grandmas will opt for the potato ricer, known to them as a “schiacciapatate,” pictured on the left, because it breaks down the potato more evenly and smoothly than the ham-handed food mill. Having done it both ways I proudly side with the grandmoms even if the proof of a difference is lacking. The food mill is really a clumsy tool for this application anyway. Next, I find that mixing the flour and potatoes after the riced potatoes reach room temperature is a better choice, having tried the recipe with cold riced potatoes and being disappointed with the result. TV chef Anne Burrell recommends exactly the opposite, claiming that chilled riced potatoes absorb less flour and result in a tenderer dumpling. The logic escapes me. The more water that evaporates out of the potatoes the less flour that can be absorbed. Chilling the stuff actually retards evaporation and keeps the unwanted moisture in place.
 You will do this by running the pieces over the tines of a fork with generously floured fingers thus forming the characteristic grooves you often find in the store-bought product. Or you can use a gnocchi board like the one pictured, thus forming not only grooves but a curled sea shell shape guaranteed to hold whatever sauce you put on it.
 This most recent cruise took us around the Caribbean to ports that I had not previously visited – St. Thomas, St. Lucia, Grenada and a few others. It was an 11-day extravaganza with four of the 11 nights requiring me to squeeze into a tux that I bought when I was 20 pounds lighter. What prompts me to write about it however is not the locations we visited, all of which resemble one another and do not require a re-visit any time soon, but the outstanding performance by the catering and restaurant staff who managed to turn out culinary masterpieces at every meal.